
Tree
Red earthenware, glaze
7″ x 5″

Small Pot
Red earthenware, underglaze
2.5″ x 2″
Star Pot
Red earthenware, underglaze + clear glaze
7″ x 3.5″
Tree
Red earthenware, glaze
7″ x 5″
Small Pot
Red earthenware, underglaze
2.5″ x 2″
Star Pot
Red earthenware, underglaze + clear glaze
7″ x 3.5″

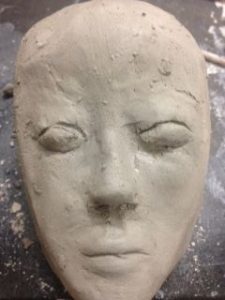


For this project, I had to plan around a schedule. I had always wanted to do a bust of a person, and when I was given the opportunity to do it for an assignment for another class, I decided to hit two birds with one stone. I wanted this to be done for the presentation, but it wasn’t fired by then, which is okay. Still, at least the form was done. I had taken some of my former knowledge from my Anubis project and applied it to how I would take on this project and did the steps similarly- sculpting the head, then the body, then attaching them with a neck.
I had to do research as well, not knowing much about Persephone’s looks. Thankfully, she had a scarf or veil of some sort on her head in multiple pictures, which made this project a lot easier since I didn’t have to work too much on her hair. Reference pictures were a big help, both ancient Greek statues and newer digital art pieces of her. It was nice to see how people interpreted her differently, and how I could apply it to my own work.


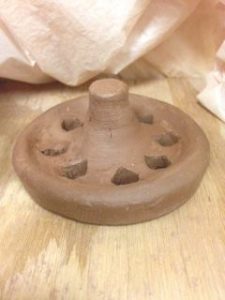

Recently I have been focusing on developing certain styles for my pots. Right now I am working on a pot that will have features similar to my previous works, yet will include something new- negative space. I think that while it is important for your artwork to be unique to you and have a style, it is important to introduce something new, not only to see if it works for you, but to push yourself outside of your comfort zone.
I decided to try negative space out for myself after I saw a video of a guy poking diamonds out of a pot. I thought it looked cool and decided I would try to mimic it in my piece, though I’d start small and try it on the lid rather than the pot itself. I think I did an okay job at it, I’ll have to clean and sharpen the lines after I finish writing, and mine is not nearly as visually pleasing as the other guy’s, but that’s okay. I’ll get there.
December 7, 2016

September 10, 2016
Two artistic behaviors I did my best on both this year and last year was reflecting / materials and tools. I’ve always been able to look back on my art and reflect on how well I did and what areas I could improve on. I feel like this helps me grow as an artist and makes my work a little better each time. I’ve also been good at finding materials and tools to use for certain things and how to use them efficiently in order to make my vessels look good.
Two areas I could improve on are global awareness and artists collaborate. Though I don’t have an issue with either of these, I tend to enjoy working on my own projects by myself. I do, however, enjoy receiving feedback from other people. I like keeping my vessels unique and original, but rarely do I seek influence from other artists.
https://www.youtube.com/channel/UCI0hwx1aPYlYOf9A-UgxGAw


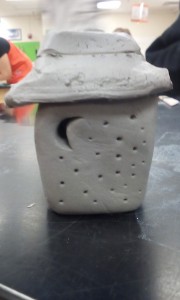
I’ve been directing my focus into not only the form of the vessels I create and the techniques I use to do so, but I have been putting more of a “painterly” focus into my pots. While the overall form is very important, making the pots unique in design is what makes them stand out. I decided to use my background in 2D art to paint my pots so they are different rather than just one solid color. I’ve been using underglaze for the most part- mainly because the colors don’t change quite as dramatically (so I can have a general idea of what they will look like once I am finished) and they are easy to mix and blend.
I think I’ve improved quite a bit- my pots are centered and a lot thinner than they used to be. (Excluding the pot in the first picture, which got off center in the opening process- but I am using it to my advantage) They aren’t nearly as heavy or bothersome as they used to be, and oftentimes people are fond of the work I create. In shape, texture, and glazing they have a significant difference from my old, flat boring pots.


This vessel is part of a set I made that includes a pitcher and jar. I noticed on this cup and the pitcher I made, both had cracks on the bottoms on the inside of the vessels. I believe this is because they are thick, especially compared to the walls. In the forms I completed afterwards, I took extra care in making sure that the bottoms are thinner so they wont crack.

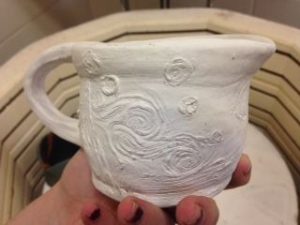
This pitcher is inspired by the painting “The Starry Night” by Vincent Van Gogh. It’s an extremely popular painting and has personal meaning to me, as it was hung in my house as a small child. I used a picture for reference, and ‘painted’ on thick slip, making painting more 3d. Though it is not exactly like the painting, I think the texture is nice and really makes it stand out.
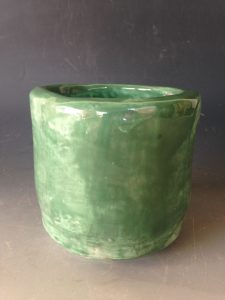
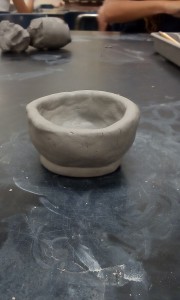
I think these pieces could been better if I put more time and effort into them. I could have made better designs and made them more detailed instead of so plain. However, these pictures show a bit of improvement form wise, as the first vessel had more of a bowl shape. The second is actually a proper cylinder, which was accomplished by focusing on bringing the walls up instead of out. In the next two photos, you can even see a more drastic improvement as I made a taller, thinner, and more even cylinder that I made into a pitcher.


I believe this piece is the end result of a lot of tips I have received from my friends. They helped me learn how to properly center the clay, and I learned a lot about bringing the walls up, which is what I was struggling with the most. One example is that I learned to use the sponge less- I had used it too much to the point the form would be too wet and the walls would collapse. This helped a lot with making the clay more manageable.


In order to use the potter’s wheel successfully, you need to understand how it works and be prepared. Firstly, you have to put on an apron in order to avoid getting slip and clay on your clothes. Then, you have to wet and dry the wheel before putting a heap of clay in the center. You have to work to center the clay. If you forget any of these steps, your wheel experience will be a disaster. To clean the equipment, you must remove all of the clay, remove the splash pans and clean them separately, then clean the wheel itself with a wooden knife, sponge, and towel.
My biggest challenge with making cylinders was making sure the top didn’t collapse or flare out. In order to avoid this, I had to make my clay a bit more dry and put more time into pulling up my walls carefully. Instead of just rushing to pull up the walls, I took my time into making sure it was as even as I could get it by pulling very slowly.